
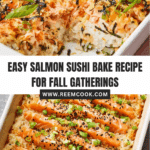
Salmon Sushi Bake Recipe
“`html
If you’re searching for a funky, delicious new way to enjoy all the flavors of your favorite fish without the fuss of rolling sushi, you’ve got to try this Salmon Sushi Bake. It’s a rich, creamy casserole that layers tender baked salmon, flavorful rice, and a spicy, tangy seafood filling all under a crackly, slightly charred top. This dish serves up all the comforting, fresh vibes of sushi in a cozy, homey package that’s as easy to make as it is to love.
Ingredients You’ll Need
Every ingredient in this Salmon Sushi Bake plays a vital role, creating a perfect harmony of textures and flavors. From the fluffy sushi rice to the creamy filling and the zing of furikake sprinkled on top, they come together to build layers of pure satisfaction.
- Salmon fillet: The star of the dish, juicy and flaky, providing a rich, meaty base.
- Salt and pepper: Simple seasonings that enhance the natural flavor of the salmon.
- Garlic powder: Adds a subtle depth and warmth to the seasoning.
- Imitation crab meat: Brings a sweet, tender texture and seafood flavor that complements the salmon wonderfully.
- Japanese mayonnaise: Creamy and slightly tangy, it melts everything together beautifully.
- Cream cheese: Softens the filling and adds a luscious, velvety texture.
- Sriracha: The hit of spiciness that wakes up the whole dish with a little kick.
- Low sodium soy sauce: Adds umami richness without overpowering the other flavors.
- Calrose sushi rice: Sticky and tender, it forms the perfect base for the bake.
- Seasoned rice vinegar: Brightens the rice with a delicate tang that balances the creamy topping.
- Furikake seasoning: A crunchy, flavorful sprinkle that delivers an instant umami punch on top.
- Chopped green onion: Fresh and aromatic, it adds a pop of color and sharpness.
- Black and white sesame seeds: Toasty, nutty, and satisfying to crunch over each bite.
How to Make Salmon Sushi Bake
Step 1: Prepare the Rice
Start by rinsing your sushi rice under cold water for about a minute to remove excess starch. Cook it in your rice cooker, then transfer the warm rice to a rimmed baking sheet. Gently fold in the seasoned rice vinegar to infuse that signature sushi tang. Allow the rice to cool to room temperature before assembling your dish—that’s what keeps the texture just right.
Step 2: Season & Bake the Salmon
Preheat your oven to 400°F (200°C). Season the salmon fillet generously with salt, pepper, and garlic powder—it’s these simple touches that elevate the natural flavor. Bake for 15 to 20 minutes until it flakes easily or reaches an internal temperature of 145°F. Let it cool just enough to handle, then shred it delicately with a fork to prepare for mixing.
Step 3: Mix the Filling
In a large bowl, combine your shredded salmon with the chopped imitation crab, creamy Japanese mayo, softened cream cheese, fiery sriracha, and savory low sodium soy sauce. Stir everything together until it’s a smooth, luscious mix—this blend is where the magic of Salmon Sushi Bake truly lives. The balance of spicy, creamy, and umami flavors will have you hooked.
Step 4: Assemble the Sushi Bake
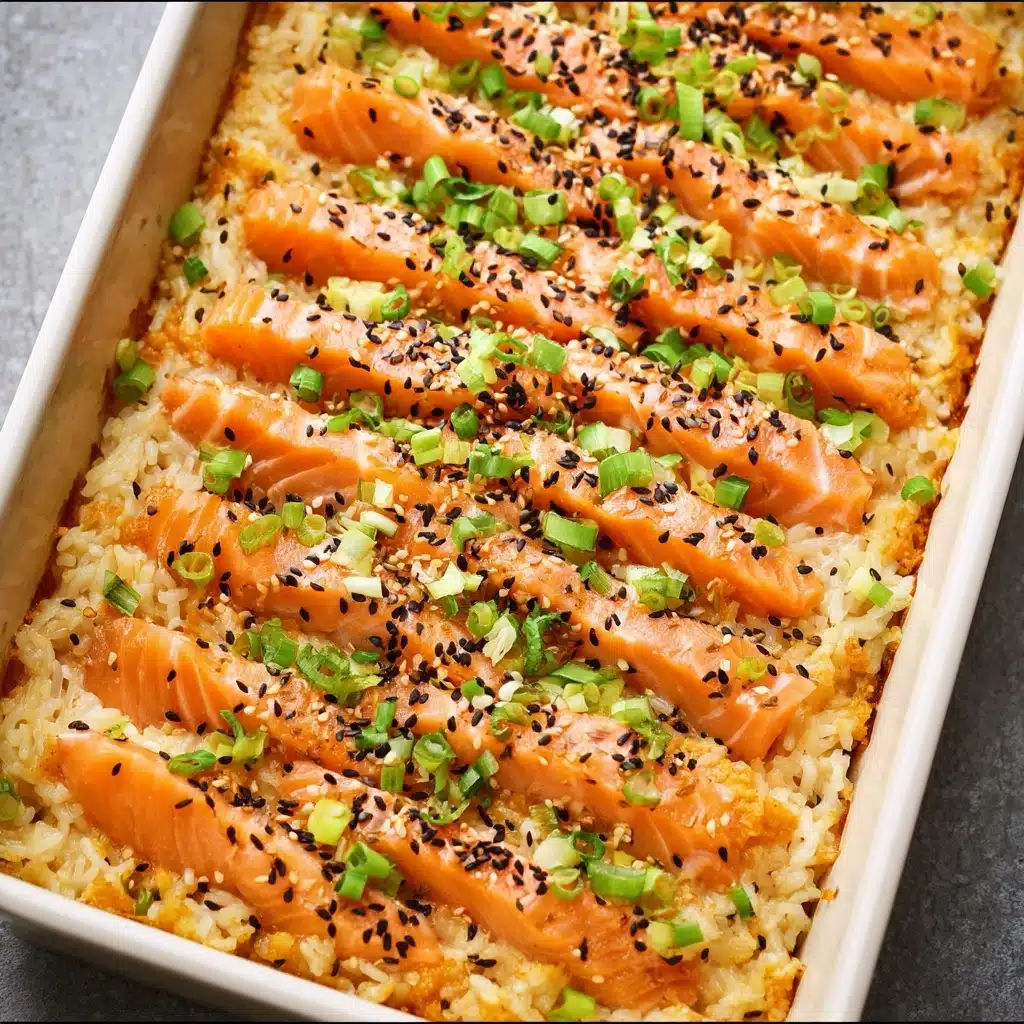
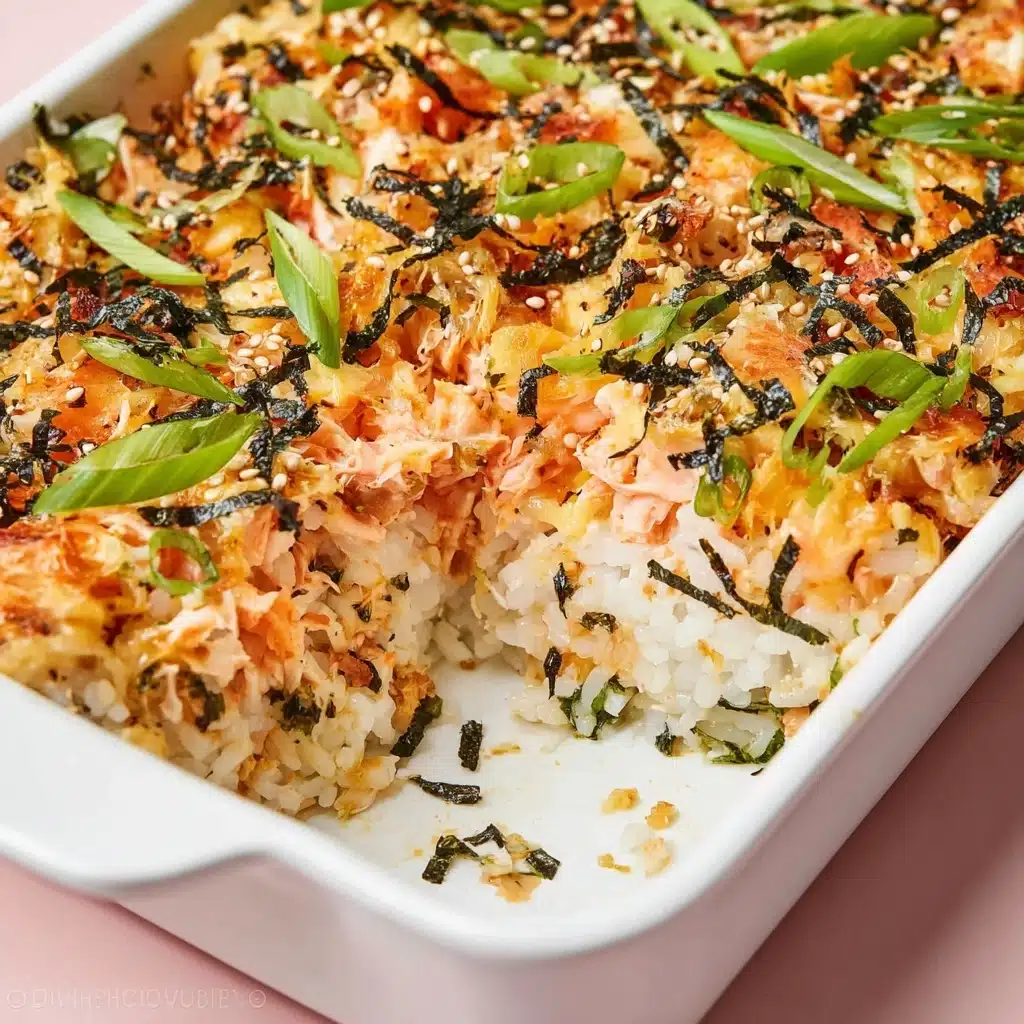
Lightly press the cooled sushi rice evenly into a 9×13-inch baking dish to form the base layer. Sprinkle a generous amount of furikake over the rice to add texture and flavor. Then, spread your salmon and crab filling over the top, smoothing it out evenly so every bite promises that creamy, spicy delight.
Step 5: Broil to Perfection
Place the assembled dish under your oven’s broiler for about 4 minutes. Keep a close eye while it broils—the goal is to achieve a slightly browned, bubbly top that hints at the layers of flavor beneath. That golden crust adds a satisfying contrast to the creamy filling and soft rice.
Step 6: Top and Serve
Once out of the oven, drizzle your Salmon Sushi Bake generously with spicy mayo made from mayo, sriracha, and a splash of lime juice for brightness. Finish with a colorful sprinkle of chopped green onions and both black and white sesame seeds. Serve warm alongside roasted seaweed, refreshing cucumber slices, and creamy avocado to complete the sushi experience in a delightful yet simple way.
How to Serve Salmon Sushi Bake
Garnishes
Garnishes are what take your Salmon Sushi Bake from delicious to absolutely irresistible. A drizzle of spicy mayo brightens every bite, while chopped green onion injects freshness and crunch. Don’t skip the sesame seeds, as their nutty flavor and slight crispness add a beautiful finishing touch both in taste and look.
Side Dishes
When serving, roasted seaweed sheets are a classic side that turns spoonfuls of this baked delight into mini hand rolls. Sliced English cucumber and ripe avocado bring cooling freshness and creaminess that balance the richness of the bake. For extra decadence, a small drizzle of unagi sauce adds a sweet-savory note that’s pure umami bliss.
Creative Ways to Present
Feeling playful? Serve your Salmon Sushi Bake in individual ramekins or mason jars for a chic presentation. Layer the components then broil for a personal-sized treat that’s perfect for parties. Or try scooping it atop crisp toast points for an inventive appetizer that marries sushi flavors with a satisfying crunch. The possibilities are endless and always yummy.
Make Ahead and Storage
Storing Leftovers
Leftover Salmon Sushi Bake can be stored in an airtight container in the refrigerator for up to three days. Because it’s layered and already fully cooked, the flavors deepen over time, making reheated bites equally enjoyable. Just be sure to cover it well to keep the rice from drying out.
Freezing
If you want to stash away portions for longer, freezing is an option. Pack the bake tightly in freezer-safe containers or wrap securely with foil and plastic wrap. It freezes well for up to one month. When ready to eat, thaw overnight in the fridge to maintain the best texture and flavor.
Reheating
To bring your Salmon Sushi Bake back to life, reheat in a preheated oven at 350°F (175°C) for about 15 minutes or until warmed through. Avoid microwaving if possible, as the oven will help keep the crispy top intact and prevent the rice from becoming gummy. Add fresh garnishes after reheating for maximum freshness.
FAQs
Can I use fresh crab instead of imitation crab meat?
Absolutely! Fresh crab adds a luxurious touch and a sweeter flavor, but imitation crab works wonderfully and is more budget-friendly. Just be sure to chop it finely to blend well in the filling.
Is it okay to use regular mayonnaise instead of Japanese mayonnaise?
You can, but Japanese mayonnaise tends to be creamier and slightly sweeter, which makes the filling extra silky. If you only have regular mayo, adding a small splash of rice vinegar or a pinch of sugar can mimic the flavor beautifully.
Can I make this recipe gluten-free?
Yes! Just substitute the soy sauce with a gluten-free tamari or coconut aminos and double-check the furikake seasoning for gluten-free labeling. Everything else is naturally gluten-free.
How spicy is the Salmon Sushi Bake?
The heat level depends on the amount of sriracha you add. The recipe calls for a balanced amount that gives a gentle kick without overwhelming the other flavors. You can easily adjust it to be milder or spicier according to your taste.
Can I prepare Salmon Sushi Bake ahead of time?
You can prepare all the components in advance and assemble just before broiling. This helps keep the rice texture perfect and the top crispy. It’s a fantastic dish for entertaining because most of the work is done ahead!
Final Thoughts
This Salmon Sushi Bake is truly a gem for anyone who loves the flavors of sushi but wants a fuss-free, comforting meal. It’s creamy, spicy, and perfectly layered to satisfy sushi cravings with a twist. Trust me, once you try this dish, it’s going to become your go-to for gatherings or a cozy weeknight treat. So, gather your ingredients and get ready to enjoy a little slice of sushi heaven at home!
“`
PrintSalmon Sushi Bake Recipe

Salmon Sushi Bake is a modern twist on traditional sushi that layers baked seasoned salmon, a creamy crab mixture, and sushi rice into a comforting casserole. This easy-to-make dish combines tangy seasoned rice, savory umami-filled salmon and crab, and flavorful toppings like furikake, spicy mayo, green onions, and sesame seeds. Served warm with optional accompaniments like roasted seaweed, cucumber, and avocado, it’s perfect for gatherings or a satisfying weeknight meal.
- Prep Time: 25 minutes
- Cook Time: 25 minutes
- Total Time: 50 minutes
- Yield: 6 servings 1x
- Category: Main Dish
- Method: Baking, Broiling
- Cuisine: Japanese Fusion
- Diet: Low Salt
Ingredients
For the Salmon
- 1½ lb salmon fillet
- Salt & pepper, to taste
- ½ tsp garlic powder
Filling
- 8 oz imitation crab meat, chopped
- ½ cup Japanese mayonnaise
- 4 oz cream cheese, softened
- 1 tbsp sriracha
- 1 tbsp low sodium soy sauce
Rice
- 2 cups Calrose sushi rice
- ¼ cup seasoned rice vinegar
Topping
- 2 tbsp furikake (any variety)
- Spicy mayo (made with mayo, sriracha, and lime juice)
- Chopped green onion
- Black & white sesame seeds
Serve With (optional)
- Roasted seaweed
- Unagi (eel) sauce
- Sliced English cucumber
- Avocado slices
Instructions
- Prepare the Rice: Rinse 2 cups of sushi rice under cold water for 1 minute to remove excess starch. Cook the rice in a rice cooker or pot according to package instructions with water. Once cooked, transfer the rice to a rimmed baking sheet and gently fold in ¼ cup of seasoned rice vinegar using a rice paddle or spatula. Allow the rice to cool to room temperature.
- Season & Bake the Salmon: Preheat your oven to 400°F (200°C). Season the salmon fillet evenly with salt, pepper, and garlic powder. Place it on a baking sheet and bake for 15–20 minutes, or until the salmon reaches an internal temperature of 145°F and flakes easily. Remove from oven and let it cool slightly, then shred the salmon into bite-sized pieces with a fork.
- Mix the Filling: In a large mixing bowl, combine the shredded salmon, chopped imitation crab meat, Japanese mayonnaise, softened cream cheese, sriracha, and low sodium soy sauce. Mix thoroughly until the ingredients are evenly incorporated and the mixture is creamy.
- Assemble the Sushi Bake: Lightly press the cooled seasoned sushi rice evenly into the bottom of a 9×13-inch baking dish to form a compact layer. Sprinkle 2 tablespoons of furikake evenly over the rice layer. Spread the salmon and crab mixture evenly over the furikake layer, smoothing the top.
- Broil: Place the dish under a preheated broiler for about 4 minutes, watching closely, until the top of the salmon mixture begins to brown slightly and develop a light crust.
- Top & Serve: Remove the baking dish from the oven. Drizzle the top with prepared spicy mayo and additional sriracha if desired. Garnish with chopped green onions and a sprinkle of black and white sesame seeds. Serve the sushi bake warm with roasted seaweed, sliced English cucumber, avocado slices, and unagi sauce on the side for dipping or topping.
Notes
- You can adjust the spiciness by varying the amount of sriracha in the filling and spicy mayo.
- Use a non-stick or lightly oiled baking dish to prevent sticking.
- Let the rice cool properly before assembling to avoid a soggy bake.
- Substitute fresh crab meat for imitation crab for a more premium taste.
- For a gluten-free version, use tamari or gluten-free soy sauce.
- The sushi bake is best enjoyed immediately but can be refrigerated and reheated gently.
Nutrition
- Serving Size: 1/6 of recipe (approx. 1 cup)
- Calories: 624 kcal
- Sugar: 2 g
- Sodium: 602 mg
- Fat: 28 g
- Saturated Fat: 7 g
- Unsaturated Fat: 19 g
- Trans Fat: 0 g
- Carbohydrates: 59 g
- Fiber: 2 g
- Protein: 30 g
- Cholesterol: 93 mg
Keywords: salmon sushi bake, baked sushi casserole, sushi bake recipe, easy sushi bake, sushi casserole, seafood casserole, Japanese fusion, baked salmon sushi


