
Red Velvet Bear Cookies Recipe
Introduction
These Red Velvet Bear Cookies are adorable, chewy treats perfect for any occasion. With a rich red velvet flavor and cute bear faces decorated in chocolate, they’re sure to delight both kids and adults alike.

Ingredients
- 1 ½ cup all-purpose flour, spooned and leveled
- 2 tbsp cocoa powder, sifted
- ½ tsp baking soda
- ½ tsp baking powder
- ½ tsp salt
- ½ cup unsalted butter, melted and cooled
- ¼ cup granulated sugar
- ¼ cup light or dark brown sugar, packed
- 1 tsp vanilla extract
- 1 tsp white vinegar
- 1 egg
- Red food coloring
- 1 tbsp melted milk or dark chocolate
- 3 tbsp melted white chocolate
- Oil-based food coloring (pink/red)
Instructions
- Step 1: In a medium bowl, whisk together the flour, cocoa powder, baking soda, baking powder, and salt until well combined.
- Step 2: In a stand mixer fitted with the paddle attachment (or using a hand mixer or whisk), mix the melted butter with granulated and brown sugars on medium speed until combined. Scrape the bowl as needed.
- Step 3: Add the vanilla extract, white vinegar, egg, and red food coloring to the butter mixture. Mix until smooth.
- Step 4: Gradually add the dry ingredients to the wet ingredients and stir until combined. Add more red food coloring if a deeper color is desired. Cover the dough and refrigerate for 20-30 minutes to firm up and hydrate the flour.
- Step 5: Preheat the oven to 325°F (163°C). Line two baking sheets with parchment paper or silicone mats.
- Step 6: Using a small cookie scoop (about 1 ½ tablespoons), shape dough into balls and place them about 3 inches apart on the baking trays. For the bear ears, take about 1 teaspoon of dough, split it into two smaller balls, and place them on top of each cookie to form ears.
- Step 7: Bake for 9-11 minutes, or until the edges are set and the centers look slightly puffy. Slightly underbaking will keep cookies chewy.
- Step 8: Let cookies cool on the baking sheets for 5-10 minutes, then transfer to a wire rack to cool completely.
- Step 9: To decorate the bear faces, use a piping bag, toothpick, or cookie scribe. Draw snouts and ears with melted white chocolate. Tint some with oil-based pink or red food coloring to add blush. If white chocolate thickens, stir in a teaspoon of neutral oil to smooth it out.
- Step 10: Use melted milk or dark chocolate to pipe the eyes and noses.
- Step 11: Allow chocolate decorations to set before serving. Enjoy your charming Red Velvet Bear Cookies!
Tips & Variations
- Chilling the dough helps achieve chewier cookies and makes shaping easier.
- If you don’t have oil-based food coloring, add a little vegetable or canola oil to melted chocolate to prevent seizing when coloring.
- For a festive look, try using colorful sprinkles around the bear faces before the chocolate sets.
Storage
Store cooled cookies in an airtight container at room temperature for up to 5 days. To keep them fresh longer, you can refrigerate for up to 1 week. Reheat slightly in the microwave or let them come to room temperature before serving to restore softness.
How to Serve

Serve this delicious recipe with your favorite sides.
FAQs
Can I use natural food coloring instead of oil-based?
Natural water-based food coloring can cause melted chocolate to seize and become lumpy. It’s best to use oil-based food coloring or add a small amount of neutral oil to the chocolate when mixing in color.
How do I make the cookies more chewy?
Underbaking slightly so the centers stay soft and moist will make the cookies chewier. Additionally, chilling the dough before baking helps develop better texture.
PrintRed Velvet Bear Cookies Recipe
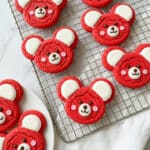
This recipe for Red Velvet Bear Cookies combines the rich flavor of classic red velvet cake with a playful bear design. These soft and chewy cookies are tinted with red food coloring and decorated with melted white and dark chocolate to create adorable bear faces, making them perfect for festive occasions or fun treats.
- Prep Time: 25 minutes
- Cook Time: 11 minutes
- Total Time: 1 hour 1 minute
- Yield: 16 cookies 1x
- Category: Baking
- Method: Baking
- Cuisine: American
Ingredients
Dry Ingredients
- 1 ½ cup all-purpose flour, spooned and leveled
- 2 tbsp cocoa powder, sifted
- ½ tsp baking soda
- ½ tsp baking powder
- ½ tsp salt
Wet Ingredients
- ½ cup unsalted butter, melted and cooled
- ¼ cup granulated sugar
- ¼ cup light or dark brown sugar, packed
- 1 tsp vanilla extract
- 1 tsp white vinegar
- 1 large egg
- red food coloring (amount as needed)
Decoration
- 1 tbsp melted milk or dark chocolate
- 3 tbsp melted white chocolate
- oil-based food coloring (pink/red, for coloring white chocolate)
Instructions
- Prepare Dry Ingredients: In a medium bowl, whisk together the all-purpose flour, sifted cocoa powder, baking soda, baking powder, and salt ensuring they are blended evenly.
- Mix Wet Ingredients: In a stand mixer fitted with the paddle attachment, combine the melted and cooled butter with granulated and brown sugar on medium speed until well combined. Scrape down the bowl to incorporate all ingredients evenly. Add vanilla extract, white vinegar, egg, and red food coloring; mix again until smooth and uniform in color.
- Combine Dry and Wet Mixtures: Add the dry ingredient mixture to the wet ingredients and stir until just combined. Add additional red food coloring to deepen the red hue if desired. Cover the dough and refrigerate for 20-30 minutes to hydrate the flour and firm up the butter, creating a chewier texture and making the dough easier to handle.
- Preheat and Prepare Baking Sheets: Preheat your oven to 325°F (163°C). Line two baking trays with parchment paper or silicone baking mats.
- Shape Cookies: Using a small cookie scoop (about 1 ½ tablespoon per cookie), scoop dough and roll into balls. Place each ball onto the prepared baking sheets about 3 inches apart. For the bear ears, take about 1 teaspoon of dough, divide it into two smaller equal pieces, roll into balls, and place these on top of the main cookie dough balls to form ears.
- Bake Cookies: Bake in the preheated oven for 9 to 11 minutes, until the edges are set and the centers appear slightly puffy. Slight underbaking will make the cookies chewier.
- Cool Cookies: Let the cookies cool on the baking sheet for 5 to 10 minutes before transferring them to a wire rack to cool completely.
- Decorate Faces: Using a piping bag, toothpick, or cookie scribe, decorate the cookies. Use melted white chocolate to draw the snouts and ears, tinting some with oil-based pink or red food coloring to add blush. If the white chocolate seizes from the coloring, add a teaspoon of neutral oil (like canola or vegetable oil) at a time and stir until smooth again.
- Add Eyes and Noses: Use melted milk or dark chocolate to pipe on the bear’s eyes and noses.
- Serve and Enjoy: Allow decorations to set and enjoy your cute, delicious red velvet bear cookies!
Notes
- Using oil-based food coloring for chocolate coloring prevents seizing; if unavailable, adding neutral oil helps restore smoothness.
- Chilling the dough is essential to yield chewier cookies and makes shaping easier.
- Underbaking slightly results in a softer, chewier texture.
- Spacing cookies about 3 inches apart prevents them from sticking together during baking.
- You can use hand mixer or whisk instead of a stand mixer if needed.
Keywords: Red Velvet Cookies, Bear Cookies, Holiday Cookies, Chocolate Bear Cookies, Festive Treats, Chewy Red Velvet, Decorative Cookies


