
Freezer Chicken Enchiladas Recipe
If you’re hunting for a delicious, comforting meal that you can prepare ahead and enjoy anytime, look no further than these Freezer Chicken Enchiladas. This recipe transforms simple, wholesome ingredients into a vibrant, cheesy, and saucy masterpiece that’s perfect for weeknight dinners, casual gatherings, or whenever you crave that perfect blend of savory and spicy with a creamy touch. The beauty of these enchiladas lies not only in their incredible flavor but in their freezer-friendly nature, making them the ultimate make-ahead meal to have on hand when life gets busy.

Ingredients You’ll Need
Each ingredient in this recipe plays a key role in creating those irresistible flavors and textures that make Freezer Chicken Enchiladas so special. From the tender, seasoned chicken to the creamy sour cream, every component contributes something unique to the final dish.
- 2 cups leftover diced rotisserie chicken: Using rotisserie chicken saves time and adds juicy, flavorful meat without extra effort.
- 2 1/2 cups enchilada sauce (divided): This brings the signature tangy, slightly smoky flavor that ties the whole dish together.
- 1 1/2 cups shredded cheddar cheese (divided): Cheese adds gooey, melty richness and a sharp bite to contrast the sauce.
- 1/2 cup sour cream: Provides creaminess and a slight tang to balance the spices.
- 1/4 cup chopped fresh cilantro leaves: Cilantro gives a fresh, herbaceous lift to brighten every bite.
- 1 4-ounce can diced green chiles: Adds just the right amount of mild heat and subtle earthiness.
- 12 6-inch flour tortillas, warmed: Soft, pliable tortillas make rolling these enchiladas easy and delicious.
How to Make Freezer Chicken Enchiladas
Step 1: Preheat Your Oven and Prepare the Filling
Start by heating your oven to 375 degrees Fahrenheit; this ensures it’s ready to bake your enchiladas perfectly once assembled. Mix the diced chicken with half a cup of enchilada sauce, half a cup of shredded cheese, sour cream, fresh cilantro, and green chiles in a large bowl. This creamy filling is bursting with flavor and sets the stage for the enchiladas to shine.
Step 2: Assemble the Enchiladas
Lay each warmed tortilla flat and spoon about a quarter cup of the chicken mixture in the center. Carefully roll the tortilla to encase the filling and set it seam side down on your workspace. Repeat this with all the tortillas so you have a dozen packed with that tasty, cheesy chicken goodness.
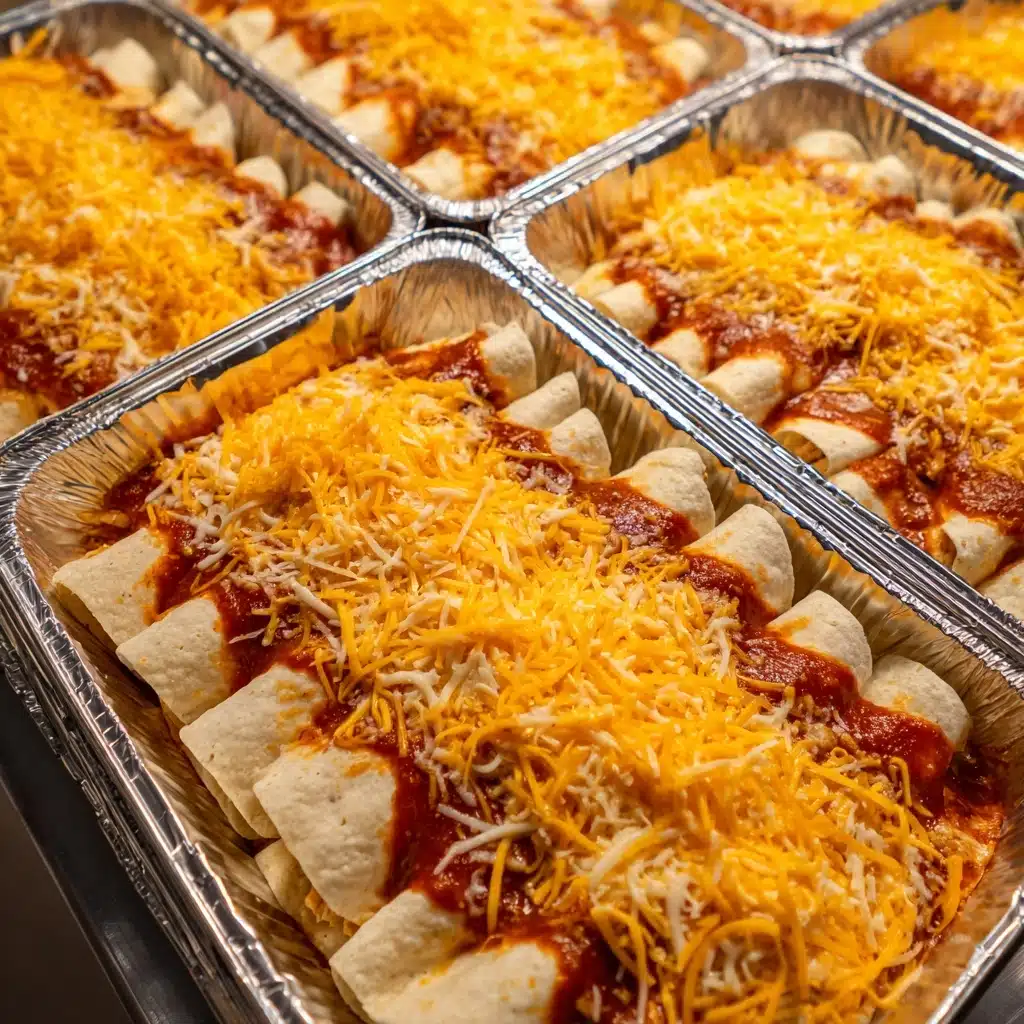
Step 3: Arrange in Pans and Add Sauce
Pour a quarter cup of enchilada sauce into the bottom of four disposable foil pans—these are perfect for freezing and easy reheating later. Place three enchiladas in each pan, then cover them with the remaining enchilada sauce and top with the rest of your shredded cheddar cheese. This layering ensures every bite is rich and gooey.
Step 4: Bake Until Bubbly
Slide the pans into your preheated oven and let the magic happen for 15 to 20 minutes. You’ll know they’re ready when the sauce bubbles up around the edges and the cheese melts into a golden, inviting layer. It’s the kind of sight that gets everyone’s mouth watering instantly.
How to Serve Freezer Chicken Enchiladas
Garnishes
Top your enchiladas with extra fresh cilantro leaves, a dollop of sour cream, or sliced avocado to add coolness and an extra layer of flavor. A squeeze of fresh lime juice over the top brightens the dish and adds zesty pizzazz. Don’t forget a sprinkle of diced onions or jalapenos if you want a bit more crunch and heat!
Side Dishes
Serve these enchiladas alongside a fresh, crisp salad dressed with lime vinaigrette for a refreshing contrast. Mexican rice and refried beans make perfect traditional sides, rounding out the meal with satisfying textures. For a lighter touch, steamed veggies or corn on the cob work beautifully too.
Creative Ways to Present
If you’re serving guests or want to elevate the presentation, try serving the enchiladas in individual ramekins with a sprinkle of extra cheese melted on top. Or layer the fillings in a casserole dish for a family-style presentation. Wrapping each baked enchilada with a colorful napkin adds a festive feel to any casual dinner party.
Make Ahead and Storage
Storing Leftovers
Leftover Freezer Chicken Enchiladas can be stored covered in the refrigerator for up to 3 days. Make sure to keep them in airtight containers to maintain that perfect balance of saucy and cheesy goodness without drying out.
Freezing
This recipe shines as a freezer-friendly meal. Assemble the enchiladas as directed but skip baking. Cover the pans tightly with plastic wrap and aluminum foil, then freeze for up to 3 months. Having these ready in your freezer means you can enjoy a homemade Mexican feast anytime with almost zero prep.
Reheating
When you’re ready to eat, bake the frozen enchiladas covered at 375 degrees Fahrenheit for about 30-35 minutes. Uncover during the last 10 minutes to allow the cheese to brown beautifully. You can also reheat portions in the microwave for a quick meal, but the oven method yields the best texture.
FAQs
Can I use other types of cheese for Freezer Chicken Enchiladas?
Absolutely! While cheddar adds a nice sharpness, you can mix in Monterey Jack, mozzarella, or a Mexican blend for different flavors and meltiness.
Is it necessary to warm the tortillas before assembling?
Warming tortillas makes them more flexible and less likely to tear when rolling, ensuring neat and intact enchiladas that hold their filling well.
Can I make these enchiladas gluten-free?
Yes, simply swap the flour tortillas for corn tortillas or gluten-free tortillas to keep this dish gluten-friendly without sacrificing flavor.
How spicy are these Freezer Chicken Enchiladas?
The heat level is mild thanks to the diced green chiles; you can adjust by adding hotter peppers or extra spices if you like a spicier kick.
Can I prepare these without sour cream?
Yes, you can replace sour cream with Greek yogurt or omit it entirely, but the creamy texture and tang it adds really enhance the filling.
Final Thoughts
There’s something wonderfully comforting about Freezer Chicken Enchiladas that combines ease, flavor, and convenience all in one dish. Whether you’re meal prepping for the week or looking for a crowd-pleaser for your next gathering, these enchiladas deliver every time. Give this recipe a try—it might just become your new favorite make-ahead meal and a staple in your freezer rotation!
PrintFreezer Chicken Enchiladas Recipe

Delicious and convenient freezer-friendly chicken enchiladas made with leftover rotisserie chicken, melty cheddar cheese, and a flavorful enchilada sauce. Perfect for a comforting weeknight dinner or meal prep, these enchiladas bake up bubbly and cheesy with a creamy cilantro and green chile filling.
- Prep Time: 15 minutes
- Cook Time: 15-20 minutes
- Total Time: 35 minutes
- Yield: 12 enchiladas (serving 4 pans, 3 enchiladas per pan) 1x
- Category: Main Dish
- Method: Baking
- Cuisine: Mexican
- Diet: Low Salt
Ingredients
Filling
- 2 cups leftover diced rotisserie chicken
- 1/2 cup enchilada sauce
- 1/2 cup shredded cheddar cheese
- 1/2 cup sour cream
- 1/4 cup chopped fresh cilantro leaves
- 1 4-ounce can diced green chiles
Assembly and Topping
- 2 cups enchilada sauce (additional, divided)
- 1 cup shredded cheddar cheese (additional)
- 12 6-inch flour tortillas, warmed
Instructions
- Preheat Oven: Preheat your oven to 375 degrees F (190 degrees C) to get it ready for baking the enchiladas.
- Make Filling: In a large bowl, combine diced rotisserie chicken, 1/2 cup enchilada sauce, 1/2 cup shredded cheddar cheese, sour cream, chopped fresh cilantro, and diced green chiles. Mix well until all ingredients are evenly incorporated.
- Assemble Enchiladas: Lay each warmed 6-inch flour tortilla flat on a clean surface. Spoon about 1/4 cup of the chicken mixture into the center of each tortilla. Roll each tortilla tightly and place seam side down. Repeat until all tortillas are filled.
- Prepare Pans: Pour approximately 1/4 cup of enchilada sauce onto the bottom of four 5-inch disposable aluminum pans to prevent sticking and add flavor. Place 3 rolled enchiladas into each pan.
- Add Sauce and Cheese: Spoon the remaining enchilada sauce evenly over the enchiladas in each pan. Sprinkle the remaining shredded cheddar cheese on top to create a cheesy crust.
- Bake: Place the pans in the preheated oven and bake for 15-20 minutes, or until the sauce is bubbly and the cheese has melted and begun to brown slightly.
- Serve: Remove from oven and serve hot immediately for best taste and texture.
Notes
- You can prepare the enchiladas in advance and freeze the assembled pans before baking for an easy meal later.
- Substitute corn tortillas for a gluten-free version, keeping in mind they may be less flexible.
- Use mild or hot diced green chiles depending on your spice preference.
- For a creamier texture, add a little extra sour cream or a splash of heavy cream to the filling.
- Leftover enchiladas keep well refrigerated for up to 3 days and can be reheated in the oven or microwave.
Nutrition
- Serving Size: 1 enchilada
- Calories: 280
- Sugar: 3g
- Sodium: 580mg
- Fat: 14g
- Saturated Fat: 7g
- Unsaturated Fat: 5g
- Trans Fat: 0g
- Carbohydrates: 22g
- Fiber: 2g
- Protein: 18g
- Cholesterol: 55mg
Keywords: chicken enchiladas, freezer meal, rotisserie chicken recipe, easy dinner, Mexican casserole

