
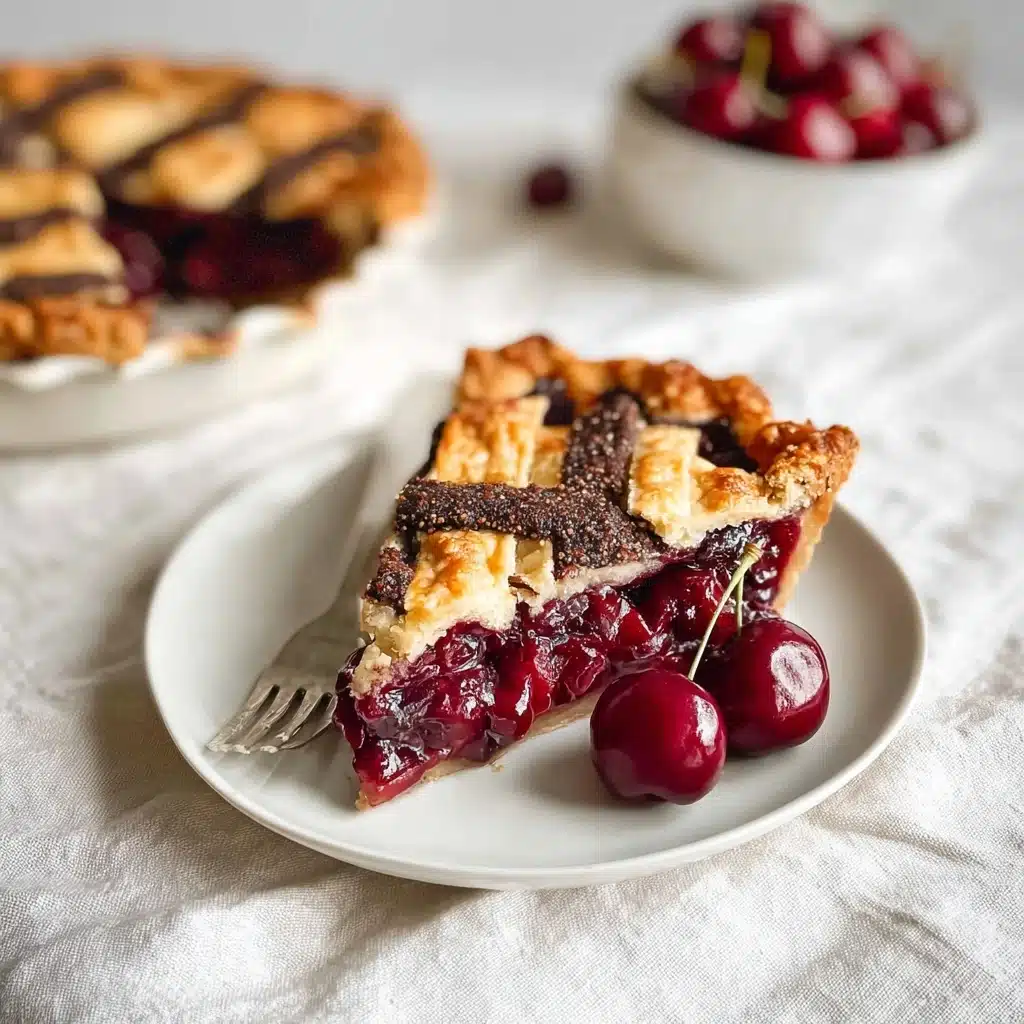
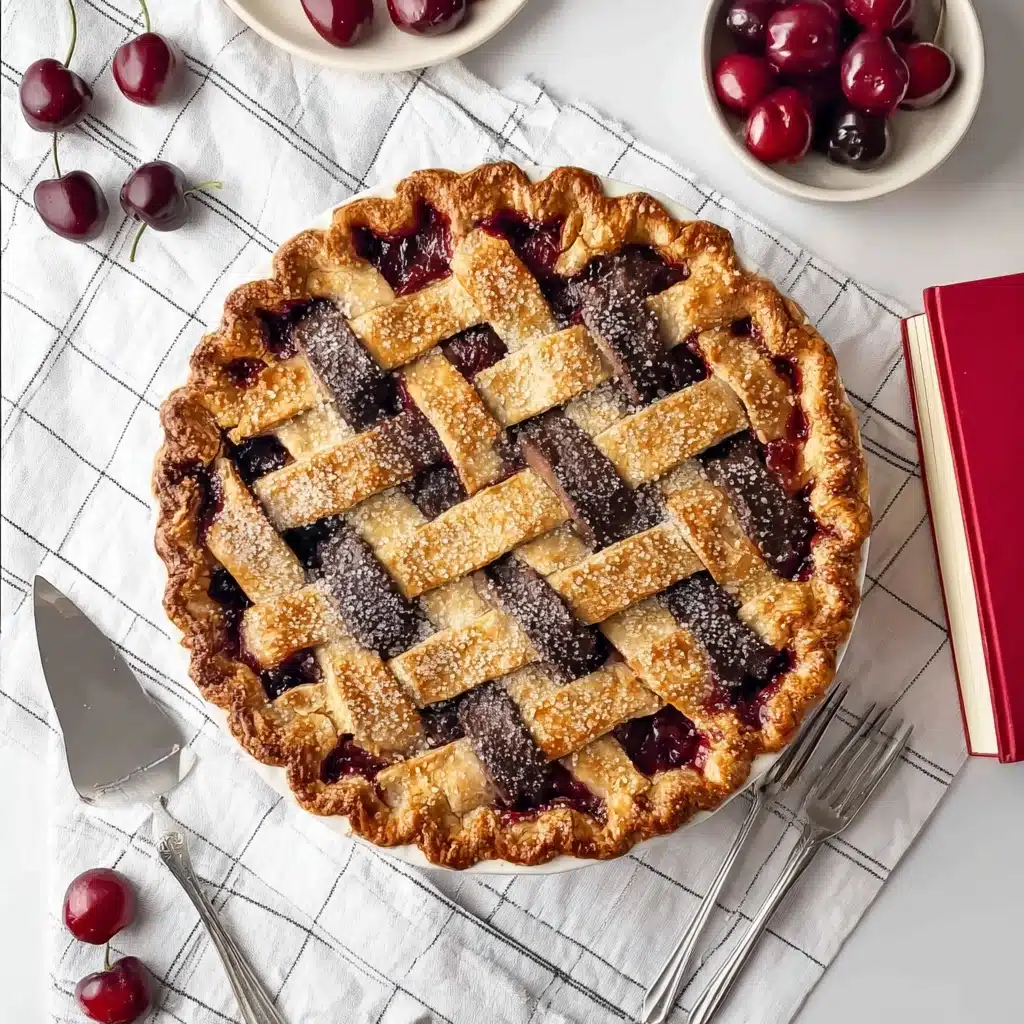
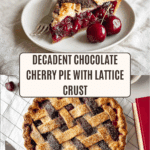
Chocolate Cherry Pie Recipe
If you love the satisfying combination of rich chocolate and juicy cherries, you’ll fall head over heels in love with this Chocolate Cherry Pie. Imagine tender, cocoa-kissed pastry enveloping a tumble of sweet-tart cherries, with just enough chocolate to add deep, dreamy richness in every bite. This is one of those beloved desserts everyone should have in their baking repertoire—it’s perfect for summer gatherings, winter holidays, or when you simply can’t resist the call of fruit and chocolate together.
Ingredients You’ll Need
The magic of this Chocolate Cherry Pie starts with simple, thoughtfully chosen ingredients. Every element plays a starring role, from the crisp chocolate crust to the luscious cherry-chocolate filling. Here’s a quick look at what you’ll need—and why you shouldn’t skip a thing.
- Flour: The backbone for both the chocolate and plain crusts, giving your pie structure and a tender flake.
- Unsweetened cocoa powder: Deepens the chocolate flavor in the crust, making every bite taste decadent.
- Sugar: Balances the tart cherries and brings just the right sweetness to both the crust and filling.
- Salt: A pinch highlights all the flavors and cuts through the richness.
- Vegetable oil: Keeps the crust tender without overwhelming the other flavors.
- Unsalted butter: Adds irresistible flakiness and rich flavor to the chocolate dough.
- Water, cold: Prevents the butter from melting before baking, creating those perfect pastry layers.
- Vegetable shortening: An old-school trick for a super flaky, melt-in-your-mouth crust.
- Egg: Used in both the plain crust and the egg wash for a glossy, golden finish.
- White vinegar: Relax the gluten in the dough, ensuring your crust stays flaky instead of tough.
- Whole fresh cherries: The juicy star—fresh cherries make a world of difference here; take the time to pit them!
- Lemon juice: Adds a bright pop and keeps the cherry flavor from feeling too heavy.
- Vanilla bean paste: Deliciously fragrant, it adds warmth and complexity to the filling.
- Chocolate extract: A secret weapon for even more chocolate intensity—don’t skip it if you can find it!
- Tapioca starch: Thickens the filling beautifully, holding the juicy cherries together with just the right gooeyness.
- Chocolate, chopped (60% cacao): Adds real chocolate pockets inside the filling—total heaven.
- Raw sugar: Sprinkled on top for a delightful crunch and sparkle.
How to Make Chocolate Cherry Pie
Step 1: Mix the Chocolate Crust
Let’s get started with bold chocolatey goodness! In a large bowl, stir together the flour, cocoa powder, sugar, and salt until well combined. Pour in the vegetable oil and mix until you get a crumbly texture. Next, toss in the cold butter, and use a pastry blender or fork to cut it in—look for a texture like coarse meal. Drizzle in cold water one tablespoon at a time, mixing gently, just until the dough comes together in a ball.
Step 2: Chill and Divide
Divide your dough in half, shape each into a disk, and wrap tightly in plastic. Let them chill in the fridge for at least an hour—this step is non-negotiable for maximum flakiness!
Step 3: Prepare the Plain Crust
In a separate bowl, combine flour and shortening, and blend with your pastry blender until there are no large lumps. In another small bowl, whisk together egg, vinegar, and cold water, then pour this into little “wells” you make in your flour mix. Stir it all together till you get a soft dough, then knead gently, form a disk, and chill for an hour.
Step 4: Roll Out the Bottom Crust
Dust your counter with flour and roll one chocolate dough disk out to fit your pie plate. Carefully transfer it (patch any cracks with extra dough as needed), then pop the plate back into the fridge while you prepare the next steps.
Step 5: Make the Cherry Filling
Pit your cherries (it’s a bit of a task but so worth it!), then halve and toss them with lemon juice, fragrant vanilla bean paste, and chocolate extract. In another bowl, whisk together sugar, tapioca starch, and salt to break up any lumps—this ensures no gluey bits in your finished pie. Pour the dry mix over your cherries and stir to coat, then fold in the chopped chocolate for those rich bursts in every bite.
Step 6: Fill and Chill Again
Spoon the cherry mixture into your prepared crust, spreading it evenly. Return the whole thing to the fridge while you tackle the top crust.
Step 7: Create a Lattice or Patterned Top
Roll the remaining chocolate dough and the plain dough to about a quarter-inch thick. Now, get creative! Cut strips and weave them together for a marbled lattice effect, or layer shapes and patterns as you wish. Place your decorated pie back in the refrigerator to keep everything cold (which helps it bake up extra flaky).
Step 8: Bake to Perfection
Preheat your oven to 400°F. Whisk up the egg with a tablespoon of water for your egg wash, then brush it over the crust. Sprinkle generously with raw sugar if you love a little crunch! Set your pie on a baking sheet (in case of drips) and bake for about 1 hour and 15 minutes. Check after 30 minutes—if the top is browning too fast, tent with foil to protect it. Resist the urge to cut right away; cool the pie fully so it slices cleanly, and all that juicy filling stays put.
How to Serve Chocolate Cherry Pie
Garnishes
The finishing touch is everything! A scoop of vanilla ice cream or a generous dollop of whipped cream is classic, but a dusting of powdered sugar or dark chocolate shavings on top will make your Chocolate Cherry Pie feel like it came straight from a bakery. For an extra-special treat, add a cherry or small sprig of mint as a pop of color.
Side Dishes
If you’re going all out, a pie this bold pairs beautifully with coffee, espresso, or a glass of milk. On the lighter side, serve with a fruit salad sprinkled with berries, or alongside a small wedge of brie or mascarpone for a playful mix of flavors—each bite of Chocolate Cherry Pie becomes a little tasting adventure.
Creative Ways to Present
Don’t be afraid to show off your baking skills! For parties, slice the pie into small bars or “pie sticks” for easy sharing. Mini “hand pies” using the same filling and dual doughs look adorable and taste just as heavenly. You can also layer pieces into parfait glasses with ice cream and whipped cream for a totally crowd-pleasing pie sundae.
Make Ahead and Storage
Storing Leftovers
If you happen to have any pie left at the end of the day (trust me, it’ll go quickly!), simply cover your Chocolate Cherry Pie loosely with foil or plastic wrap. It’ll keep well for up to 3 days at room temperature, or up to 5 days in the refrigerator. The filling stays luscious, and the crust remains crisp.
Freezing
Want to bake ahead? Chocolate Cherry Pie freezes beautifully. Slice and wrap individual pieces tightly in plastic and foil, or wrap the whole cooled pie before freezing. It’ll keep for up to 2 months. When you’re ready for a slice, thaw it overnight in the fridge, or reheat straight from frozen.
Reheating
To serve your pie warm, set it in a 325°F oven for 10–15 minutes until heated through. This brings back that just-baked aroma and helps the crust crisp up. Single slices can be microwaved for 20–30 seconds, though the oven is best for whole-pie goodness.
FAQs
How do I pit cherries quickly for Chocolate Cherry Pie?
While a cherry pitter is definitely the fastest way, you can use a sturdy reusable straw or even a chopstick to poke out the pits! It’s a bit messy, but totally worth it for that unbeatable fresh cherry flavor.
Can I use frozen cherries instead of fresh?
Yes, you can! Just be sure to thaw and drain them well before baking to avoid a watery filling. The pie might need a few extra minutes in the oven, but the flavor will still be incredible.
What’s a good substitute if I can’t find chocolate extract?
While chocolate extract really intensifies the flavor, you can use an extra half teaspoon of vanilla extract or a drop of espresso powder instead. Both give a delicious, complementary boost to the chocolate.
Can I make the dough ahead of time?
Absolutely! You can make both doughs up to two days in advance. Keep them tightly wrapped in the refrigerator until you’re ready to roll and bake. You can also freeze the dough for up to a month—just thaw overnight in the fridge before using.
Why does my pie filling seem too runny?
It’s vital to cool the pie completely before slicing, as the tapioca starch needs time to set the filling. If you cut too soon, the juices won’t thicken properly. Always let it reach room temperature for neat, luscious slices.
Final Thoughts
There’s something irresistibly joyful about making and sharing Chocolate Cherry Pie with loved ones—every bite is a blend of nostalgia and pure delight. Don’t be surprised if it becomes a new favorite in your kitchen. Grab some cherries, roll up your sleeves, and let this legendary pie win you over!
PrintChocolate Cherry Pie Recipe

Indulge in the rich, decadent flavors of this Chocolate Cherry Pie. A perfect combination of a buttery chocolate crust filled with a luscious cherry filling and topped with a beautifully woven lattice crust, this dessert is sure to impress your guests.
- Prep Time: 45 minutes
- Cook Time: 1 hour 15 minutes
- Total Time: 2 hours
- Yield: 1 pie (8-10 servings) 1x
- Category: Dessert
- Method: Baking
- Cuisine: American
- Diet: Vegetarian
Ingredients
For Chocolate Crust:
- 2 cups flour
- ½ cup unsweetened cocoa powder
- ¼ cup sugar
- ½ tsp salt
- ¼ cup vegetable oil
- ½ cup unsalted butter, cold and cut into pieces
- 5–7 Tbsp cold water
For Plain Crust:
- 1½ cups flour
- 10 Tbsp vegetable shortening
- 1 egg
- 1 Tbsp white vinegar
- 2 Tbsp cold water
For Filling:
- 6 cups whole fresh cherries
- 1 Tbsp lemon juice
- 1 tsp vanilla bean paste
- 1 tsp chocolate extract
- ¾ cup sugar
- ¼ cup tapioca starch
- ¼ tsp salt
- 4 oz chocolate, chopped
- 1 egg
- 1 Tbsp water
- Raw sugar, if desired
Instructions
- For Chocolate Crust: In a large bowl, combine flour, cocoa, sugar, and salt. Stir to combine. Add oil and stir until mixture resembles coarse meal. Add the cold butter and toss to coat. Cut in butter until no large pieces remain. Add cold water until dough gathers into a ball. Divide dough, wrap, and chill.
- For Plain Crust: Combine flour and shortening. Make wells, pour egg mixture, and stir into a soft dough. Knead into a ball, wrap, and chill.
- To Prepare Bottom Crust: Roll chocolate dough, line pie plate, and chill.
- For Filling: Pit cherries, add lemon juice, vanilla, chocolate extract, and sugar mixture. Toss to coat. Stir in chopped chocolate. Pour into lined pie plate.
- To Prepare Top Crust: Roll dough, create lattice, chill.
- Finishing/Baking: Preheat oven. Brush egg wash over pie, sprinkle with sugar. Bake for about 1 hour & 15 minutes. Cool completely before slicing.
Notes
- Use cold ingredients to ensure a flaky crust.
- Chill the dough to prevent shrinkage during baking.
- Adjust sugar in filling based on the sweetness of the cherries.
- Feel free to customize the crust design for a personal touch.
Nutrition
- Serving Size: 1 slice
- Calories: 320
- Sugar: 20g
- Sodium: 180mg
- Fat: 15g
- Saturated Fat: 7g
- Unsaturated Fat: 6g
- Trans Fat: 0g
- Carbohydrates: 45g
- Fiber: 3g
- Protein: 4g
- Cholesterol: 35mg
Keywords: Chocolate Cherry Pie, Dessert Recipe, Homemade Pie, Baking
