
A Delicious and Easy Recipe
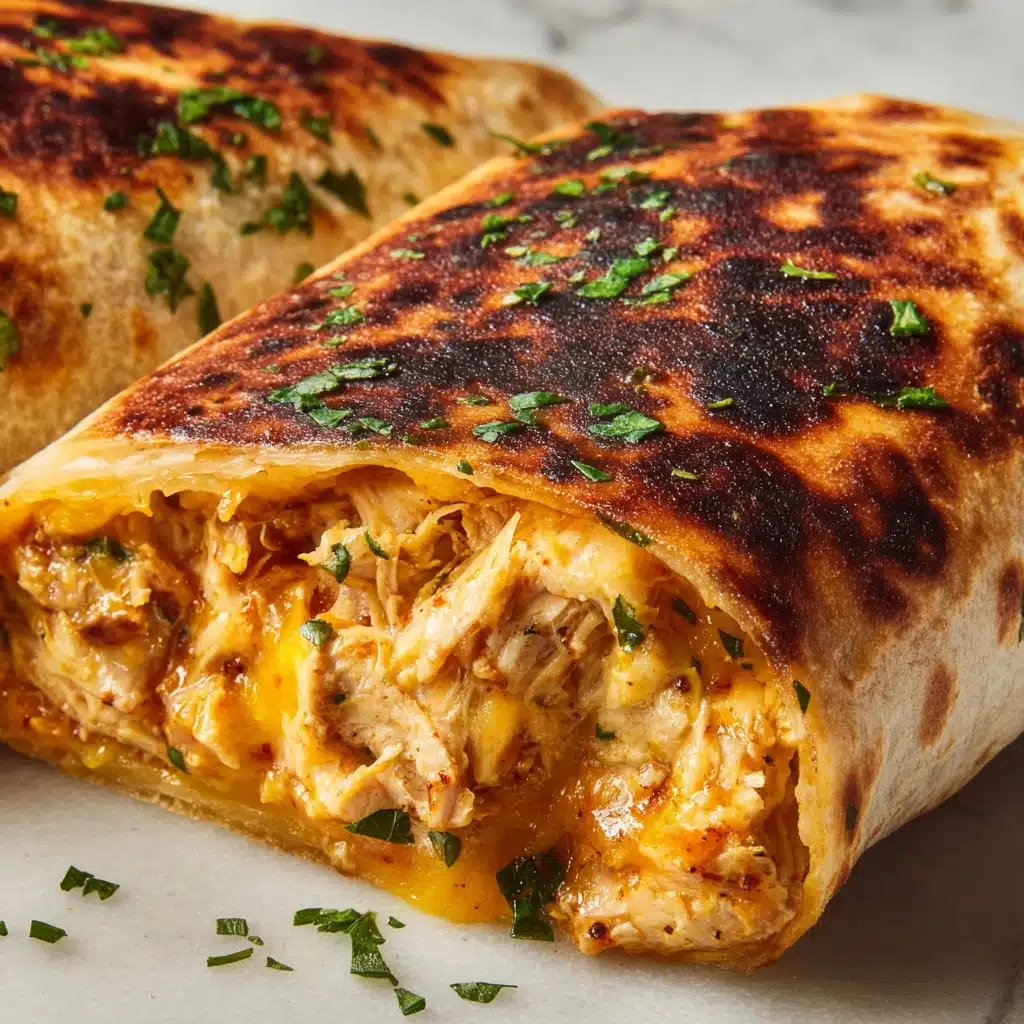
If you’re looking for a meal that’s both comforting and quick to whip up, these Cheesy Chicken Garlic Wraps are exactly what you need! This recipe promises A Delicious and Easy experience, pairing juicy, well-spiced chicken with gooey melting cheeses, all inside a golden, crispy tortilla. Each bite is packed with flavors of garlic, tangy cheese, and a hint of herbs, making it a mouthwatering option for busy weeknights or relaxed weekend lunches. Plus, the ingredient list is simple and offers room for creative twists, so you can make this wrap truly your own!

Ingredients You’ll Need
The beauty of these Cheesy Chicken Garlic Wraps lies in how each ingredient adds something essential—whether it’s the boldness of garlic, the creamy richness of cheese, or the vibrant freshness of spinach. Let’s break down the core components that work together to create A Delicious and Easy treat.
- Chicken Breasts: Lean, tender protein that soaks up the marinade beautifully and delivers a hearty filling.
- Mozzarella Cheese: Provides a delightful creamy melt that stretches every bite into a cheesy dream.
- Cheddar Cheese: Adds sharpness and a lovely orange color for extra flavor complexity.
- Flour Tortillas: The perfect wrap vessel, turning golden and crisp when cooked in the skillet.
- Fresh Garlic: Four cloves bring a savory punch and irresistible aroma.
- Olive Oil: Used both in the marinade and the skillet, ensuring juicy chicken and crispy wrap edges.
- Paprika: Gives warmth and a smoky undertone that lifts the whole dish.
- Onion Powder: Subtle sweetness to round out the marinade flavors.
- Dried Oregano: Italian herb brightness for an earthy note.
- Salt & Pepper: Essential for making all the flavors pop.
- Fresh Spinach (Optional): A handful adds color and a boost of nutrition (plus it wilts beautifully).
- Sour Cream (for serving): Cool, creamy contrast to the hot, cheesy filling.
- Fresh Cilantro (for garnish): Brings a burst of freshness and vibrant green color.
How to Make A Delicious and Easy
Step 1: Prep and Marinate the Chicken
Start by gently rinsing your chicken breasts and patting them dry—a quick dry ensures better browning later. Slice them into thin strips, about an inch wide. In a bowl, stir together the minced garlic, olive oil, paprika, onion powder, dried oregano, salt, and pepper. Toss the chicken slices in this aromatic marinade, making sure each piece is thoroughly coated. Marinate for at least 15–20 minutes to let all those flavors mingle; if you have extra time, popping it in the fridge for an hour will make it even better.
Step 2: Cook the Chicken
Heat a large skillet over medium-high heat and drizzle in a little more olive oil. Add the marinated chicken strips in a single layer—if your skillet is cozy, cook in batches to avoid steaming. Sauté for about 5–7 minutes, stirring now and then, until the strips become golden brown and the chicken is fully cooked (aim for an internal temp of 165°F or 75°C). Set aside when done.
Step 3: Sauté the Spinach (Optional)
If you’re adding spinach, this is your moment! Toss the fresh leaves into the hot skillet and sauté for just a minute or two, until wilted and deep green. This bonus veggie layer adds a fresh dimension that pairs beautifully with the savory chicken and cheese.
Step 4: Assemble the Wraps
Lay each flour tortilla flat on a clean surface. Spoon a generous amount of cooked chicken into the center—about a quarter of your batch per wrap. Scatter an even mix of mozzarella and cheddar cheese over the top, letting it rain down cheesy goodness. If you sautéed spinach, add it now for an extra hit of green and flavor.
Step 5: Roll ‘Em Up
Fold in the sides of each tortilla, then roll it up snugly from the bottom to the top, tucking as you go. This keeps the delicious filling securely inside and helps you get that classic wrap shape. Set each one aside, seam-side down, so they’re ready for their final crispy transformation.
Step 6: Crisp Up the Wraps
Wipe out your skillet and place it back over medium heat. Working in batches, nestle the wraps seam-side down in the pan. Cook for 3–4 minutes on each side until gloriously golden and crisp. This step turns your creation into A Delicious and Easy handheld meal with the best contrast of textures—melty inside, crispy outside!
Step 7: Slice and Serve
Transfer each finished wrap to a cutting board and let it cool slightly for clean slicing. Cut each wrap in half on the diagonal for that irresistible, cheese-pulling Instagram moment. Time to serve!
How to Serve A Delicious and Easy
Garnishes
There’s nothing like a flourish of fresh cilantro on top of your wraps right before serving! It instantly brightens the plate and adds a pop of herbal flavor. Pair with a dollop of sour cream on the side for dipping—you’ll love how the cool creaminess contrasts with the garlicky, cheesy filling. A squeeze of lime is also lovely for those who enjoy a citrusy kick!
Side Dishes
Round out this meal with a fresh, crunchy slaw or a chilled cucumber salad if you’re craving extra veggies. Classic sides like roasted potatoes or spiced sweet potato fries also work wonders with A Delicious and Easy wrap like this. And for a simple pairing, a bowl of tomato soup makes a cozy, comforting combo.
Creative Ways to Present
If you’re serving these at a gathering, slice the wraps into bite-sized rounds and skewer each with a toothpick for a fun party platter. Buffet-style DIY wrap bars are always a hit too—set out the fillings and let everyone build their own! You can even pack them for a picnic lunch; just wrap in foil to keep them toasty.
Make Ahead and Storage
Storing Leftovers
Store any leftover Cheesy Chicken Garlic Wraps in an airtight container in the fridge. They’ll stay fresh and flavorful for up to three days, making them an ideal make-ahead lunch or snack. Place parchment paper between wraps if stacking to keep them from sticking together.
Freezing
If you’d like to freeze A Delicious and Easy wrap for future lunches, wrap each cooled wrap individually in foil or plastic wrap, then tuck them into a freezer-safe bag or container. Freeze for up to two months for best texture and taste. Remember to label and date them so you know when you stashed them away!
Reheating
To reheat, unwrap and place the wrap on a baking sheet. Bake in a preheated oven at 350°F (175°C) for about 10–15 minutes, or until heated through and crispy again. You can also zap them in the microwave for a quicker lunch, though the tortilla won’t be as crisp.
FAQs
Can I use a different type of cheese?
Absolutely! Feel free to swap in pepper jack for spice or use Colby, Monterey Jack, or even a bit of crumbled feta. The blend of gooey and sharp cheeses is key for that A Delicious and Easy texture, so mix and match to your taste.
How do I make this recipe vegetarian?
To turn this into a vegetarian wrap, simply swap the chicken for sautéed mushrooms, black beans, or even tofu strips marinated with the same spices. You’ll still get plenty of that garlicky, cheesy flavor explosion.
What’s the best way to keep the tortillas from tearing?
Warm your tortillas briefly in the microwave or wrap them in foil and heat in the oven. This makes them more flexible and less prone to tearing while you roll up all that A Delicious and Easy filling.
Can these wraps be made ahead for meal prep?
Yes! Assemble the wraps as directed, crisp in the skillet, let them cool, and then refrigerate. You can quickly reheat for a grab-and-go meal or lunchbox treat—making A Delicious and Easy option for busy weekdays.
Should I add the cilantro before or after cooking?
Fresh cilantro is best used as a garnish after the wraps are cooked. Its vibrant flavor and color are the perfect final touch for A Delicious and Easy wrap.
Final Thoughts
If you’re craving hearty comfort food with minimal fuss, you need to treat yourself to A Delicious and Easy homemade wrap like this. These Cheesy Chicken Garlic Wraps deliver everything you want in a meal: melty, savory, and irresistibly satisfying. Give them a try—you might just find your new favorite go-to recipe!
PrintA Delicious and Easy Recipe

Cheesy Chicken Garlic Wraps are a delicious and easy-to-make meal that combines tender marinated chicken with gooey melted cheese, all wrapped in a crispy tortilla. Perfect for a quick lunch or dinner!
- Prep Time: 25 minutes
- Cook Time: 20 minutes
- Total Time: 45 minutes
- Yield: 4 servings 1x
- Category: Main Course
- Method: Pan-Frying, Baking
- Cuisine: Mexican-inspired
- Diet: Gluten Free
Ingredients
For the Marinated Chicken:
- 2 large chicken breasts, boneless and skinless
- 4 cloves garlic, minced
- 1 tablespoon olive oil
- 1 teaspoon paprika
- 1 teaspoon onion powder
- 1 teaspoon dried oregano
- Salt and pepper to taste
For the Wraps:
- 1 cup shredded mozzarella cheese
- 1 cup shredded cheddar cheese
- 4 large flour tortillas
- 1 cup fresh spinach leaves (optional)
- 1/2 cup sour cream (for serving)
- 1/4 cup fresh cilantro, chopped (for garnish)
Instructions
- Preheat Oven: Preheat the oven to 375°F (190°C).
- Prepare Chicken: Rinse and pat dry the chicken breasts, then slice them into thin strips.
- Make Marinade: In a bowl, mix garlic, olive oil, paprika, onion powder, oregano, salt, and pepper. Marinate chicken in this mixture.
- Cook Chicken: Cook marinated chicken in a skillet until golden brown and cooked through.
- Assemble Wraps: Fill tortillas with chicken, cheeses, and optional spinach. Roll up the tortillas.
- Crisp the Wraps: Cook the wraps in a skillet until crispy on both sides.
- Serve: Let cool slightly, then slice and serve with sour cream and cilantro.
Notes
- You can customize these wraps by adding other ingredients like bell peppers, onions, or jalapeños.
- For a spicier kick, consider adding some hot sauce or red pepper flakes to the chicken marinade.
Nutrition
- Serving Size: 1 wrap
- Calories: 380 kcal
- Sugar: 2g
- Sodium: 620mg
- Fat: 20g
- Saturated Fat: 10g
- Unsaturated Fat: 8g
- Trans Fat: 0g
- Carbohydrates: 24g
- Fiber: 1g
- Protein: 25g
- Cholesterol: 75mg
Keywords: Cheesy Chicken Garlic Wraps, Chicken Wraps, Cheese Wraps, Easy Wraps Recipe


