
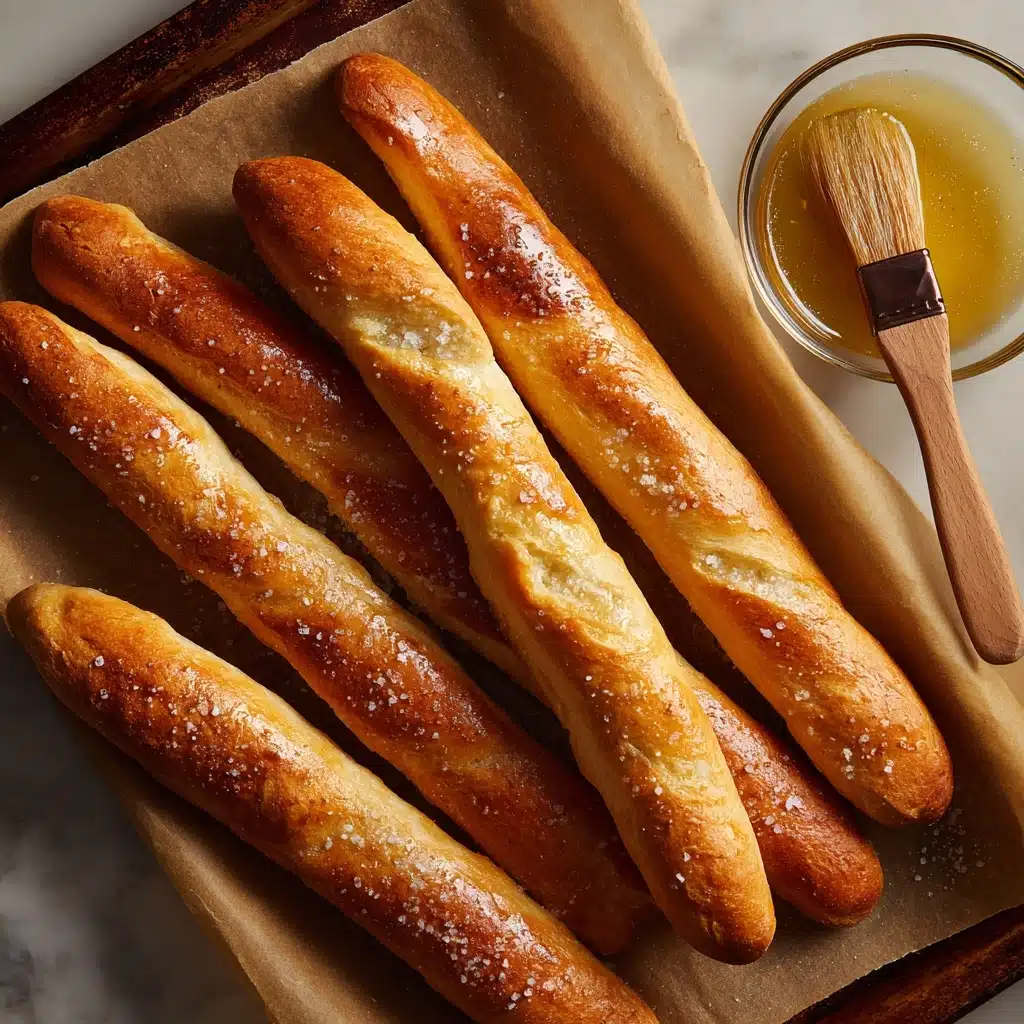
Copycat Olive Garden Breadsticks Recipe
Few things in life rival the joy of biting into warm, pillowy Copycat Olive Garden Breadsticks, fresh out of your own oven. Imagine the buttery aroma swirling through your kitchen as you create those famously soft, golden loaves with a hint of garlic and just the right sprinkle of salt. Whether you’re making an Italian-inspired feast or simply want to treat your loved ones to a classic, these breadsticks transform any meal into a restaurant-worthy experience. You’ll be amazed by how close this recipe comes to the legendary original—and you might just find yourself making them every week!
Ingredients You’ll Need
Nothing complicated here, just the classic basics that work magic together. Each ingredient gives its own special touch to your Copycat Olive Garden Breadsticks: fluffy texture, crave-worthy flavor, and that swoon-worthy finish.
- Warm Water: The ideal temperature helps the yeast bloom, setting the stage for a lofty, tender dough.
- Instant Yeast: This makes your breadsticks rise quickly and gives them their signature softness.
- Granulated Sugar: A touch of sweetness helps feed the yeast and balances the savory notes.
- Unsalted Butter (melted): Rich, creamy butter is used in both the dough and for brushing on top, creating a luscious soft crumb and glossy finish.
- Fine Sea Salt: Blends seamlessly into the dough for perfect seasoning without any crunchiness.
- Bread Flour: This gives the breadsticks their chewy bite and amazing structure—don’t substitute with all-purpose if you want that authentic texture!
- Extra Butter (melted): For brushing on the hot breadsticks, giving a golden, shiny crust.
- Kosher Salt: Adds a pop of salty freshness on top (just like at the restaurant).
- Garlic Powder: Brings that unmistakable, mouthwatering flavor that makes these breadsticks totally irresistible.
How to Make Copycat Olive Garden Breadsticks
Step 1: Prepare Your Baking Sheets
Begin by lining two baking sheets with parchment paper—this ensures your breadsticks don’t stick and makes clean-up a breeze. Getting prepared ahead of time keeps everything moving smoothly, especially when you’re working with a delicate yeast dough.
Step 2: Mix and Knead the Dough
In the bowl of your stand mixer fitted with a dough hook, combine the warm water, yeast, sugar, melted butter, and fine sea salt. Gradually add bread flour as the mixer runs on low. Once all the flour is in, boost the speed to medium and knead for 10 to 15 minutes. The dough should become tacky and super elastic—if it’s too sticky, go ahead and add a tablespoon of flour at a time until it’s perfect. This step gives your Copycat Olive Garden Breadsticks that iconic chewy, stretchy feel.
Step 3: First Rise
Coat a clean bowl with a light layer of oil, place your dough inside, and cover with plastic wrap. Set it somewhere warm and cozy—like the top of your fridge or a sunny countertop. Let the dough rise until doubled, about an hour or a little longer depending on your kitchen temperature. This slow proofing develops flavor and gives your breadsticks the perfect airy texture.
Step 4: Shape the Breadsticks
Punch down the dough to release any extra air bubbles, then divide it into 12 equal pieces (using a scale gives you even-sized sticks, which bake more evenly). Roll each piece into an 8-inch log and arrange them on your parchment-lined sheets, keeping them about 2 inches apart so they have plenty of room to rise again. Cover loosely with plastic, and let them rest for a second rise—about another hour—until noticeably puffy and doubled in size.
Step 5: Bake to Golden Perfection
Preheat your oven to 400°F during the final rise. Once the breadsticks are ready, slip them in and bake for 12 to 14 minutes until they’re beautifully golden. The moment they emerge, brush each one generously with melted butter (don’t be shy!) and immediately sprinkle the tops with a mix of kosher salt and garlic powder. The warm bread soaks in the butter and seasoning, locking in that classic flavor.
Step 6: Refresh and Serve
If you need to reheat later, simply pop the breadsticks back onto a baking sheet and warm in a 425°F oven for 4–5 minutes. For that fresh-baked experience, feel free to brush on a little extra butter and another sprinkle of garlic powder and salt. They’ll taste just as fabulous as day one!
How to Serve Copycat Olive Garden Breadsticks

Garnishes
For that true restaurant flair, give your Copycat Olive Garden Breadsticks a second (or even third!) brush of melted butter right before serving. You can also add a pinch of dried Italian herbs, a dusting of Parmigiano-Reggiano, or a whisper of freshly cracked black pepper for an extra pop of flavor and color.
Side Dishes
These breadsticks sing alongside so many Italian favorites. Pair them with a steaming bowl of minestrone or Zuppa Toscana, or use them to scoop up every last drop of your favorite creamy pasta sauce. They’re also amazing with a big, fresh salad—just like the classic Olive Garden experience!
Creative Ways to Present
Turn your Copycat Olive Garden Breadsticks into a centerpiece by standing them upright in a tall glass or wrapping them in a checked napkin basket. Tie a rustic string around a bundle for an extra-special dinner party presentation, or slice them horizontally and serve with marinara or pesto for dipping. Your guests will adore the homey, festive touch.
Make Ahead and Storage
Storing Leftovers
If you find yourself with leftover breadsticks (a rare occasion!), keep them fresher for longer by storing in an airtight container at room temperature for up to three days. For best results, wait until they’re completely cool before sealing to prevent condensation and sogginess.
Freezing
You can freeze baked Copycat Olive Garden Breadsticks for up to two months. Once cooled, wrap each one individually in plastic wrap, then place in a larger freezer-safe bag. Thaw overnight on the counter when you’re ready to enjoy them again, and warm as desired.
Reheating
To bring breadsticks back to life, place them on a baking sheet and reheat at 350°F for around 7–8 minutes, or until heated through and lightly crisped. If you want them extra moist and shiny, brush with melted butter and finish with another sprinkle of garlic powder and salt while still hot.
FAQs
Can I make Copycat Olive Garden Breadsticks without a stand mixer?
Absolutely! Mix all the ingredients in a large bowl until a shaggy dough forms, then knead by hand on a lightly floured surface for 10–15 minutes until smooth and elastic. It’s a little workout, but the results are just as wonderful.
Why use bread flour instead of all-purpose?
Bread flour has a higher protein content, which creates more gluten during kneading. This gives Copycat Olive Garden Breadsticks their distinctive chewy, stretchy texture that all-purpose flour can’t quite replicate.
How do I know if my dough has proofed enough?
The dough should look puffed, rounded, and roughly double its original size. If you’re unsure, gently press a fingertip into the dough; if the indentation fills in slowly, you’re ready to move on to the next step.
Can I add herbs or cheese to the dough?
Definitely! You can knead in finely chopped fresh herbs, such as parsley or basil, or a handful of parmesan cheese for a flavorful twist. Just make sure not to add too much extra moisture.
What if I only have active dry yeast?
No worries—just dissolve the active dry yeast in the warm water with the sugar and let it sit for 5-10 minutes until foamy before adding the remaining ingredients. This will ensure your Copycat Olive Garden Breadsticks rise beautifully.
Final Thoughts
There’s something truly special about baking these Copycat Olive Garden Breadsticks from scratch—every soft, buttery bite delivers comfort and a touch of nostalgia. I hope you fall in love with this recipe as much as I have, and that it becomes your go-to for cozy dinners and celebratory spreads. Give them a try, and let the homemade aroma work its irresistible magic!
PrintCopycat Olive Garden Breadsticks Recipe

These Copycat Olive Garden Breadsticks are soft, garlicky, and utterly delicious. Recreate the famous restaurant breadsticks at home with this easy-to-follow recipe.
- Prep Time: 30 minutes
- Cook Time: 14 minutes
- Total Time: 3 hours
- Yield: 12 breadsticks 1x
- Category: Appetizer
- Method: Baking
- Cuisine: Italian
- Diet: Vegetarian
Ingredients
Dough:
- 1 cup plus 2 tablespoons (250 grams) warm water
- 1 1/2 teaspoons instant yeast
- 2 tablespoons (25 grams) granulated sugar
- 3 tablespoons (42 grams) unsalted butter, melted
- 1 3/4 teaspoons fine sea salt
- 3 cups (381 grams) bread flour, plus more as needed
Finishing:
- 2 tablespoons (28 grams) unsalted butter, melted
- 1/2 teaspoon kosher salt
- 1/4 teaspoon garlic powder
Instructions
- Prepare Baking Sheets: Line two baking sheets with parchment paper and set aside.
- Mix Dough: In a stand mixer bowl, combine water, yeast, sugar, melted butter, and salt. Gradually add flour while mixing on low speed. Knead for 10-15 minutes until tacky and elastic. Add more flour if needed.
- Proof Dough: Place dough in an oiled bowl, cover, and let it rise until doubled in size, about 1-1.5 hours.
- Shape Dough: Divide dough into 12 portions, roll each into an 8-inch log, and place on baking sheets. Let rise until doubled, about 1-1.5 hours.
- Bake: Preheat oven to 400°F. Bake breadsticks for 12-14 minutes until golden brown. Brush with melted butter and sprinkle with salt and garlic powder.
- Serve: Enjoy warm. To reheat, bake at 425°F for 4-5 minutes, then brush with butter and sprinkle with garlic powder and salt if desired.
Nutrition
- Serving Size: 1 breadstick
- Calories: 180
- Sugar: 2g
- Sodium: 320mg
- Fat: 7g
- Saturated Fat: 4g
- Unsaturated Fat: 2g
- Trans Fat: 0g
- Carbohydrates: 26g
- Fiber: 1g
- Protein: 3g
- Cholesterol: 15mg
Keywords: Olive Garden, Breadsticks, Copycat Recipe, Garlic Breadsticks


